Logging into a Linux VPS (Virtual Private Server) using PuTTY is a fundamental task for developers, system administrators, and IT professionals. PuTTY is a free and open-source terminal emulator that allows users to remotely access servers securely. Whether you’re managing a web server, deploying applications, or performing maintenance, knowing how to log into your Linux VPS using PuTTY is essential. In this comprehensive guide, we’ll walk you through the process step by step, ensuring you can confidently connect to your VPS.
What is PuTTY?
PuTTY is a versatile and widely-used terminal emulator that supports various network protocols, including SSH (Secure Shell), Telnet, and Rlogin. Originally designed for Windows, PuTTY is now available on multiple platforms, including Linux and macOS. Its primary function is to enable secure remote access to servers, making it a crucial tool for anyone working with Linux VPS environments.
![]()
Prerequisites
Before you can log into your Linux VPS using PuTTY, you need a few things in place:
- PuTTY Installed: Ensure that PuTTY is installed on your computer. You can download it from the official PuTTY website.
- Linux VPS Credentials: You’ll need the IP address of your Linux VPS, the SSH port (usually 22), and your login credentials (typically a username and password, or a private SSH key if using key-based authentication).
- Network Access: Ensure that your computer can reach the VPS over the internet. This means the VPS’s IP address should be accessible, and any necessary firewall settings should allow SSH connections.
Step 1: Download and Install PuTTY
If you haven’t already installed PuTTY on your computer, follow these steps:
- Visit the PuTTY Website: Go to the official PuTTY website here. Click here to visit the official download page of PuTTY.
- Download PuTTY: Choose the appropriate version for your operating system (Windows, Linux, or macOS). For Windows users, download the MSI installer to simplify the installation process.
- Install PuTTY: Run the installer and follow the on-screen instructions. Once installed, you can launch PuTTY from your Start menu or desktop shortcut.
Step 2: Gather Your VPS Details
Before logging in, make sure you have the following information:
- IP Address: The public IP address of your Linux VPS.
- SSH Port: The port number used for SSH connections (default is 22).
- Username: The username for your VPS (often “root” for the initial login).
- Password or SSH Key: Depending on your VPS configuration, you will need either the password or an SSH key for authentication.
Step 3: Launch PuTTY and Enter Your VPS Information
Once PuTTY is installed and you have your VPS details, follow these steps:
- Open PuTTY: Launch PuTTY by double-clicking the shortcut or selecting it from your Start menu.
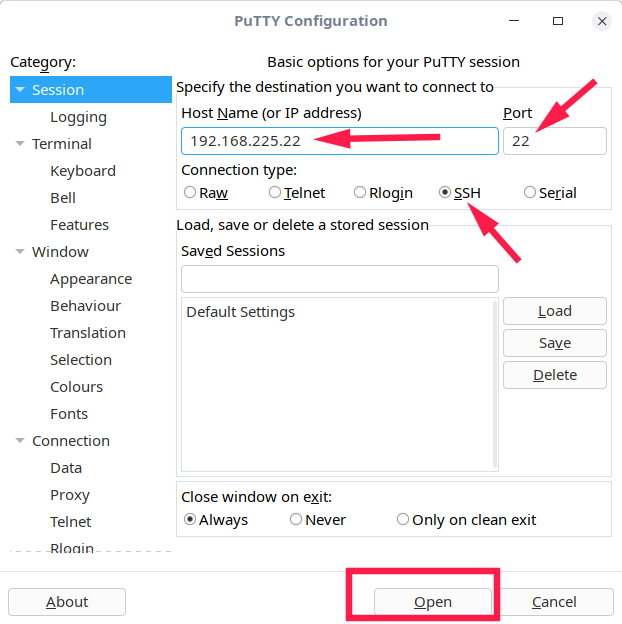
- Enter the IP Address: In the “Host Name (or IP address)” field, enter the IP address of your Linux VPS.
- Specify the SSH Port: By default, PuTTY uses port 22 for SSH connections. If your VPS uses a different port, enter it in the “Port” field.
- Save the Session (Optional): If you frequently connect to this VPS, you can save the session settings by entering a name in the “Saved Sessions” field and clicking “Save.” This allows you to quickly load the session in the future without re-entering the details.
- Click Open: Once you’ve entered the necessary details, click “Open” to initiate the connection.

Step 4: Accept the SSH Key Fingerprint
The first time you connect to a VPS, PuTTY will display a security alert about the server’s SSH key fingerprint. This is a safety feature to prevent man-in-the-middle attacks. To proceed:
- Review the Alert: PuTTY will show the server’s SSH key fingerprint and ask if you want to trust this server.
- Accept the Key: If you trust the server (which you should if you’re connecting to your own VPS), click “Yes” to store the key in PuTTY’s cache. This will prevent the alert from appearing in future connections to the same VPS.
Step 5: Log In Using Your Credentials
After accepting the SSH key fingerprint, PuTTY will prompt you to log in:
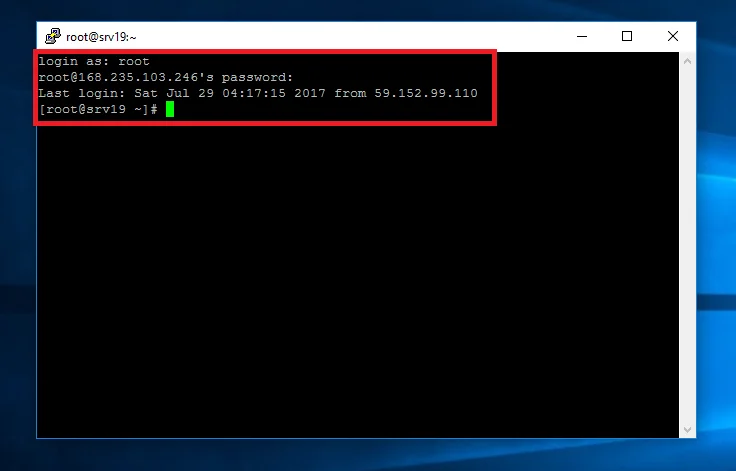
- Enter Your Username: Type the username for your VPS (e.g., “root”) and press Enter.
- Enter Your Password: If you’re using password-based authentication, you’ll be prompted to enter your password. Type it carefully, as PuTTY will not display the characters for security reasons. Press Enter after typing your password.Using SSH Key Authentication: If you prefer key-based authentication, follow these steps:
- Before clicking “Open” in PuTTY, navigate to the “SSH” section in the left-hand menu.
- Expand the “SSH” section and click on “Auth.”
- Under “Private key file for authentication,” click “Browse” and select your private SSH key file (.ppk format).
- Now, when you click “Open” and log in, PuTTY will use the SSH key for authentication instead of a password.
Step 6: Begin Managing Your VPS
Congratulations! You are now log into your Linux VPS using PuTTY. You can start managing your server, whether that’s updating software, configuring services, or deploying applications. The terminal window in PuTTY functions just like a command line interface (CLI) on your VPS, giving you full control over your server.

Logging into your Linux VPS is one of the first and most crucial skills you need to master for effective server management. Whether you’re updating your software, deploying applications, or configuring server settings, accessing your VPS securely is essential. By log into your Linux VPS using tools like PuTTY, you gain direct access to the command line interface, where you can execute commands and scripts that control every aspect of your server.
This direct control allows for efficient management of your VPS, enabling you to perform tasks such as monitoring system performance, troubleshooting issues, and maintaining the overall health of your server environment. Understanding how to log into your Linux VPS is foundational for anyone working in web development, system administration, or IT operations, as it empowers you to take full advantage of your server’s capabilities.
Additional Tips for Using PuTTY
Save Session Profiles
If you frequently connect to multiple servers, consider saving session profiles in PuTTY. This allows you to store different configurations (IP address, port, SSH key) and quickly switch between them without re-entering information each time.
Use PuTTYgen for SSH Keys
PuTTYgen is a companion tool for PuTTY that generates SSH keys. You can create a key pair (public and private keys) and use it for more secure, key-based authentication instead of relying on passwords.
Change the Default SSH Port
For added security, consider changing the default SSH port (22) to a custom port. This can help protect your VPS from automated attacks targeting common ports. Just remember to update PuTTY with the new port number.
Enable Logging
PuTTY allows you to log all session output to a file, which can be helpful for record-keeping or troubleshooting. To enable logging:
- Before connecting, go to the “Session” menu.
- Under “Logging,” choose a log file location and select the logging options that suit your needs.

Customize the Interface
PuTTY’s interface can be customized to improve readability or suit personal preferences. You can change the font size, background color, and window size by exploring the “Window” and “Appearance” settings in the left-hand menu.
Troubleshooting Common Issues
Connection Timeouts
If you experience connection timeouts, it might be due to network issues or firewall settings. Ensure that your VPS’s firewall allows SSH traffic on the specified port and that your internet connection is stable.
Authentication Failures
Double-check your username, password, or SSH key if you encounter authentication failures. Ensure that the SSH key is correctly added to your VPS’s authorized_keys file if you’re using key-based authentication.
Host Key Mismatch
If PuTTY warns about a host key mismatch, it could mean that the server’s SSH key has changed. This can happen if the VPS was reinstalled or if there’s a potential security issue. Verify the change with your hosting provider before proceeding.
Conclusion
PuTTY is an essential tool for anyone who needs to access and manage a Linux VPS remotely. By following the steps outlined in this guide, you can easily log into your Linux VPS and start performing essential tasks. Whether you’re managing a web server, deploying applications, or simply learning Linux, PuTTY provides a secure and reliable way to connect to your VPS.
For more tips, tutorials, and in-depth guides on Linux and VPS management, be sure to follow the WindowsVPSCheap blog. We regularly post content to help you get the most out of your server environment, ensuring you’re always equipped with the knowledge you need to succeed.
CATEGORY:Linux VPS

