Upload files from your computer to a Windows VPS is a common task, especially when managing your website or transferring data. Fortunately, the process is straightforward and can be accomplished using various methods. In this guide, we’ll walk you through the steps to upload files to your Windows VPS.
Step 1. Connect to Your Windows VPS
Before you can upload files, you need to connect to your Windows VPS. You can do this using Remote Desktop Connection (RDC) or any other remote desktop client of your choice. Ensure that you have the necessary login credentials provided by your VPS provider.
Step 2. Prepare Your Files
Before initiating the upload process, make sure you have the files you want to upload readily available on your local computer. Organize your files into a folder for easy access.
Step 3. Transfer Files from Your Computer to a Windows VPS
To Transfer Files from Your Computer to a Windows VPS we have 2 ways, below windowsvpscheap will guide each method in detail as follows.
Method 1: Transfer Files Using Remote Desktop
Once connected to your Windows VPS via RDP, you can transfer files using the remote desktop interface:
- Open Windows File Explorer on your local computer.
- Navigate to the folder containing the files you want to upload.
- Select the files or folders you want to transfer.
- Right-click on the selected files/folders, then click “Copy.”
- Minimize the remote desktop window or position it to one side of your screen.
- Go back to your local desktop and open the remote desktop connection to your VPS.
- Open Windows File Explorer within the remote desktop session.
- Navigate to the destination folder on your Windows VPS where you want to upload the files.
- Right-click inside the folder, then click “Paste” to transfer the files from your local computer to the VPS.
Congratulations! You have just uploaded files to your Windows VPS.
Method 2: Transfer files from your local computer to your VPS via Remote Desktop Connection
There are also many people who have used VPS but have important files on their PC that they want to transfer to the VPS but can’t copy or drag and drop. This causes a lot of inconvenience for those who are new to using VPS. The solution is also very simple, you can do as follows.
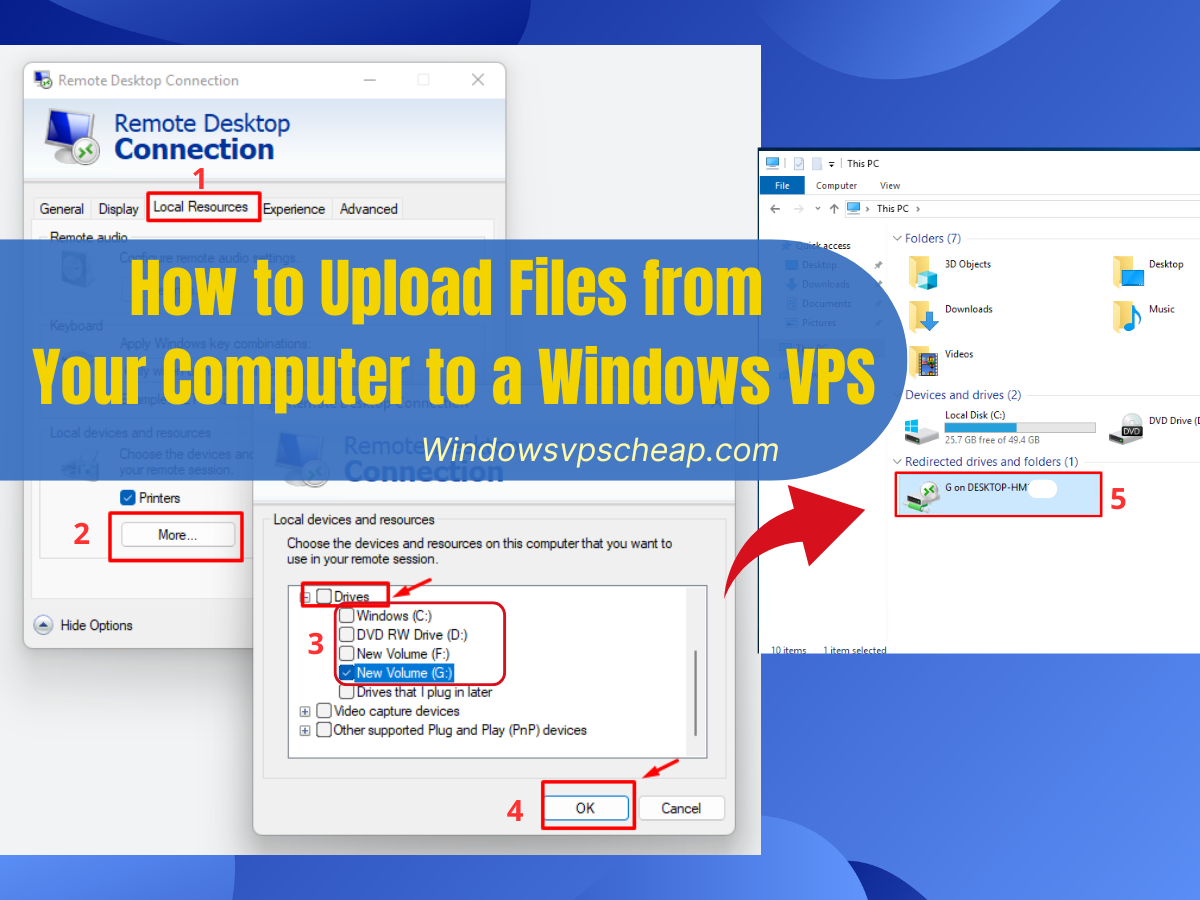
- Open the Remote Desktop Connection (RDP) function on your computer.
Click on the Start button, type “mstsc” in the search box, and press Enter. The RDP function will appear. - Before proceeding with RDP log in, click on Show Options.
- Click on the Local Resources tab.
- Under Local devices and resources, click on More.
- Select Drives to access all the drives in your local computer or click on the [+] symbol beside Drives and select a specific folder; then click OK.
- Click Hide Options to enter your VPS IP address, then click Connect.
- Enter your username and password then click OK.
- The drives you selected from your local computer will now be available on your Remote Desktop. Simply drag-and-drop the files into your VPS to upload, transfer, or copy them.
Step 4: Verify File Transfer
Once the file transfer process is complete, verify that your files have been successfully uploaded to your Windows VPS. Navigate to the destination folder on your VPS using Windows File Explorer or any other file management tool and check for the presence of the uploaded files.
For example, here I choose the G drive.
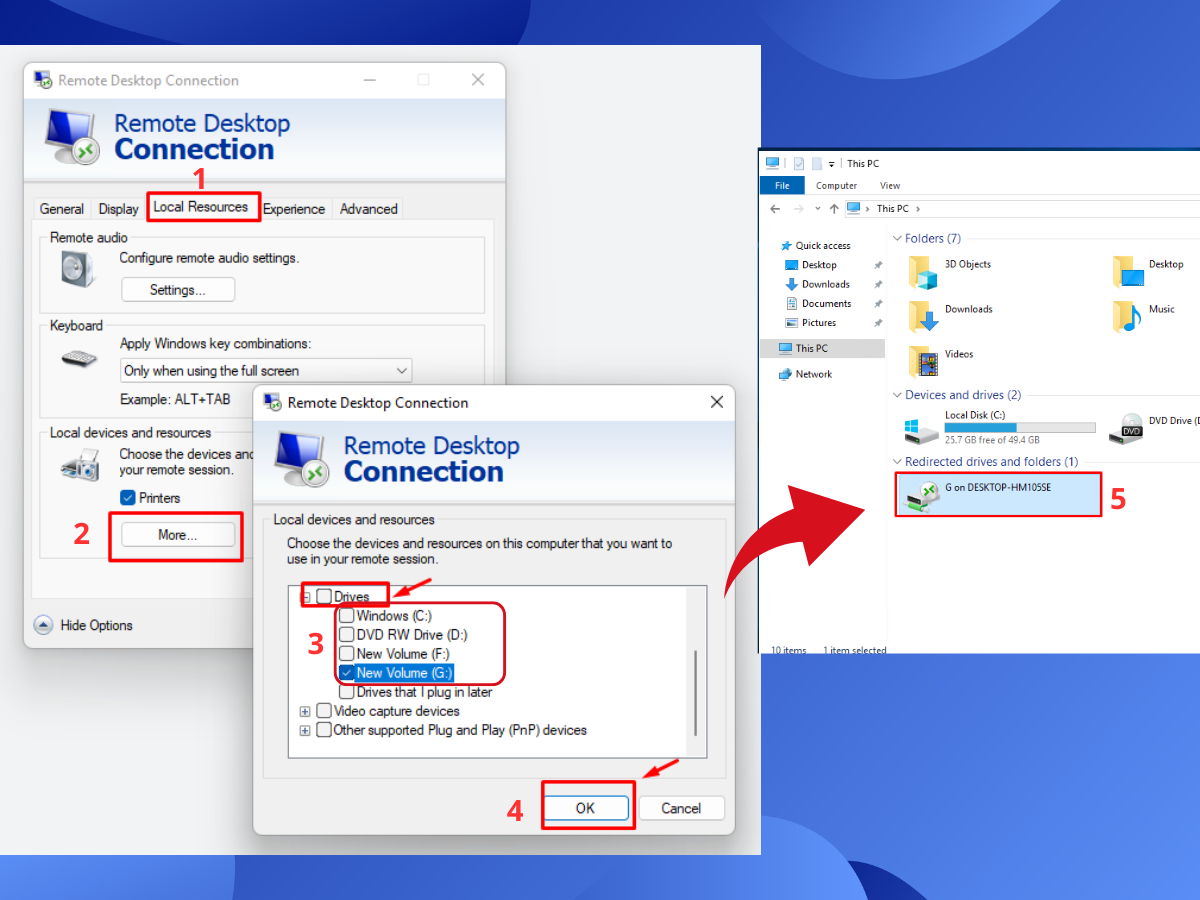
After successfully logging in to the VPS, you open the “File Explorer” and will see your installed link drive. Now, you can get the files to use for your work on the VPS.
You can do the same with other files as well. If you encounter any issues during the upload files from your computer to a Windows VPS, refer to your VPS provider’s documentation or you can contact Windowsvpscheap customer care department for assistance. Wish you success and remember to use Windowsvpscheap virtual server VPS!
Sincerely thank you.
CATEGORY:Guidance
